If you have a Shopify eCommerce site, you can integrate the site with Infoplus. When an order is placed on your Shopify site, use Infoplus to fulfill the order. Then export inventory levels from Infoplus back to Shopify. Everything happens in real time. Customize the integration based on your site and setup needs.
Connecting Infoplus to your Shopify Site is a 4-step process:
- Create a "Shopping Cart Connection" within Infoplus, then approve the permissions for Infoplus to connect to Shopify. This registers Infoplus as a Fulfillment Service in your Shopify site.
In Infoplus, map Carriers between Infoplus and Shopify.
- In Shopify, choose which products should be fulfilled by Infoplus.
- In Shopify (optionally), choose to track each product's inventory. This tells Infoplus to communicate product inventory levels to Shopify.
Create a Shopify Shopping Cart Connection
- Access the "Shopping Cart Connection" table. Two methods:
From the Dashboard: Click the “Account Management” tab, click the “Shopping Cart” App, then click the “Shopping Cart Connection" Table.
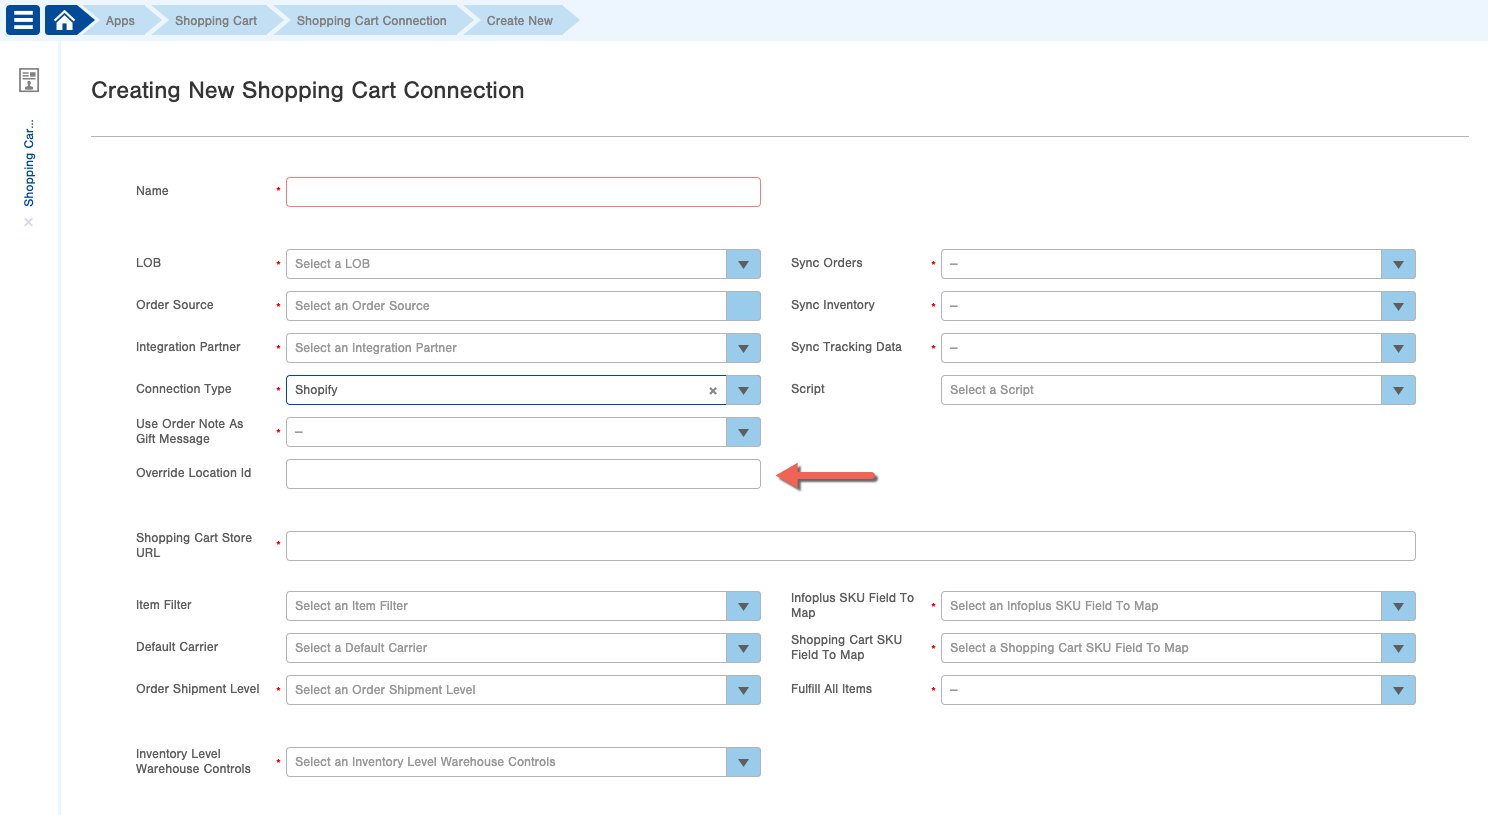
From the Quick Actions shortcut: Press a dot (period) on your keyboard, then select “Shopping Cart Connection” from the list of Quick Actions. - Click the Create New button in the top right. The "Creating New Shopping Cart Connection" screen appears. Required fields (*)

Type a Name for the Shopping Cart connection (e.g. XYZ Company Shopify).
In the LOB field, select the Line of Business associated with the shopping cart.
Select the Order Source associated with the shopping cart (e.g. Walmart, Amazon). If an Order Source is not applicable, select "Not Specified." Selecting an Order Source for Shopify orders lets you locate records and perform other actions in Infoplus (e.g. create metrics associated with the Order Source).
Note: Selecting an Order Source does not communicate which Shopify orders are to be fulfilled by Infoplus. It provides information only.
Select the Integration Partner for this shopping cart connection (e.g. SPS Commerce).
If there is no Integration Partner, select "Not Specified."
In the Connection Type field, select "Shopify."
If applicable, enter an Override Location Id to be whatever Location you want this connection to Fulfill from in Shopify.
Use Order Note as Gift Message, select True or False.
In the Sync Orders field, select whether you want Orders that are placed in Shopify to be synchronized with Infoplus. By selecting "True", when orders are created in Shopify containing items to be fulfilled by Infoplus, an order will automatically be created in Infoplus.
In the Sync Inventory field, select whether you want the Inventory levels to be pushed from Infoplus to Shopify. Selecting "True" tells Infoplus to communicate inventory levels to Shopify. Once synchronized, quantities of selected items will match.

In the Sync Tracking Data field, select whether you want shipment Tracking Data to be pushed from Infoplus to Shopify. Selecting "True" turns synchronization on. For example, you may want to send tracking data if you use Shopify to email shipment confirmations.
In the Shopping Cart Store URL field, enter your Shopify store URL. The URL must appear in this format: <store>.myshopify.com where <store> represents your URL information (e.g. xyzcompany.myshopify.com). Do not include "< or >".
The Item Filter field is optional. If you have a specific set of items that Infoplus should consider when pushing inventory levels to Shopify, create a filter in the Item table, and then select the Filter here. If all items are to be considered, leave the field blank. NOTE: Later in this process of connecting Infoplus to your Shopify site, you will need to specify within each Product record in Shopify if inventory levels should be pulled from Infoplus. An Item Filter simply allows you to narrow the list of items down further as opposed to updating each item in Shopify.
If applicable, you can enter a Default Carrier for all Orders that are sent from this connection.
In Order Shipment Level you can select how you want to update shipment of the order to Complete in your connection: at the Order level or the Item level.
In the Infoplus SKU Field to MAP and Shopping Cart SKU Field to Map fields, select the product identifiers that should be used to match products between Infoplus and Shopify. For example, if both Infoplus and Shopify use a field called "SKU" to identify the product, set both fields to SKU. If different product identifiers are used, such as Vendor SKU or UPC, select that as the SKU field.
In the Fulfill All Items field, you can select if you want all Products from the connection to be fulfilled in the connection. Note: if you do not have this set to True, Orders will not be able to sync to Infoplus.
Click Save. The record will be saved and a link will appear at the top of the screen indicating the connection is not yet complete.

To finalize the connection, click the "Click here to connect" link at the top of the window. You will be taken to the login screen for your Shopify site.
Login to your Shopify site and approve the permissions Infoplus needs to be able to communicate with Shopify. Once complete, you will be taken back to the Shopping Cart Connection record in Infoplus.
If all went well with the finalization step, a green checkmark will appear at the top of the Shopping Cart Connection record in Infoplus, similar to this:

NOTE: Infoplus will create default Carrier Mappings (shown in the screenshot above) for the Shopify connection, but you must review and add/edit Carrier Mappings as needed. The next section in this article will walk you through the steps.
At this point, the Infoplus App will now show up in the Shopify administration site as an installed app.

Add/Edit Carrier Mappings
When the Shopify connection was created, Infoplus created default Carrier Mappings. Review and add/edit Carrier Mappings as needed. For example, Shopify may name a Carrier UPS Next Day Air. Infoplus names the same Carrier UPS-1 DAY (UPS - 1). These names need to be mapped in Infoplus. Once mapped, when an order is placed in Shopify using the UPS Next Day Air Carrier, Infoplus knows to use the UPS-1 DAY (UPS - 1) Carrier.
- In Infoplus, access the Shopify Shopping Cart Connection record (in the "Shopping Cart Connection" Table) and scroll to the bottom of the record where Carrier Mappings display, similar to this:

- To Add Carrier Mappings, click the Add link.
To Edit existing Carrier Mappings, Click the gear icon ( ) to the right of the Carrier Mapping you need to edit, and select Edit.
Enter/Edit the Shopify Carrier Name and the matching Infoplus Carrier Name.
Click OK.The Carrier Mapping will be created/edited.
NOTE: To add Shipping Zones in Shopify, access the Admin screen and select Settings > Shipping. If you add carriers in Shopify, be sure to add them in Infoplus as well.
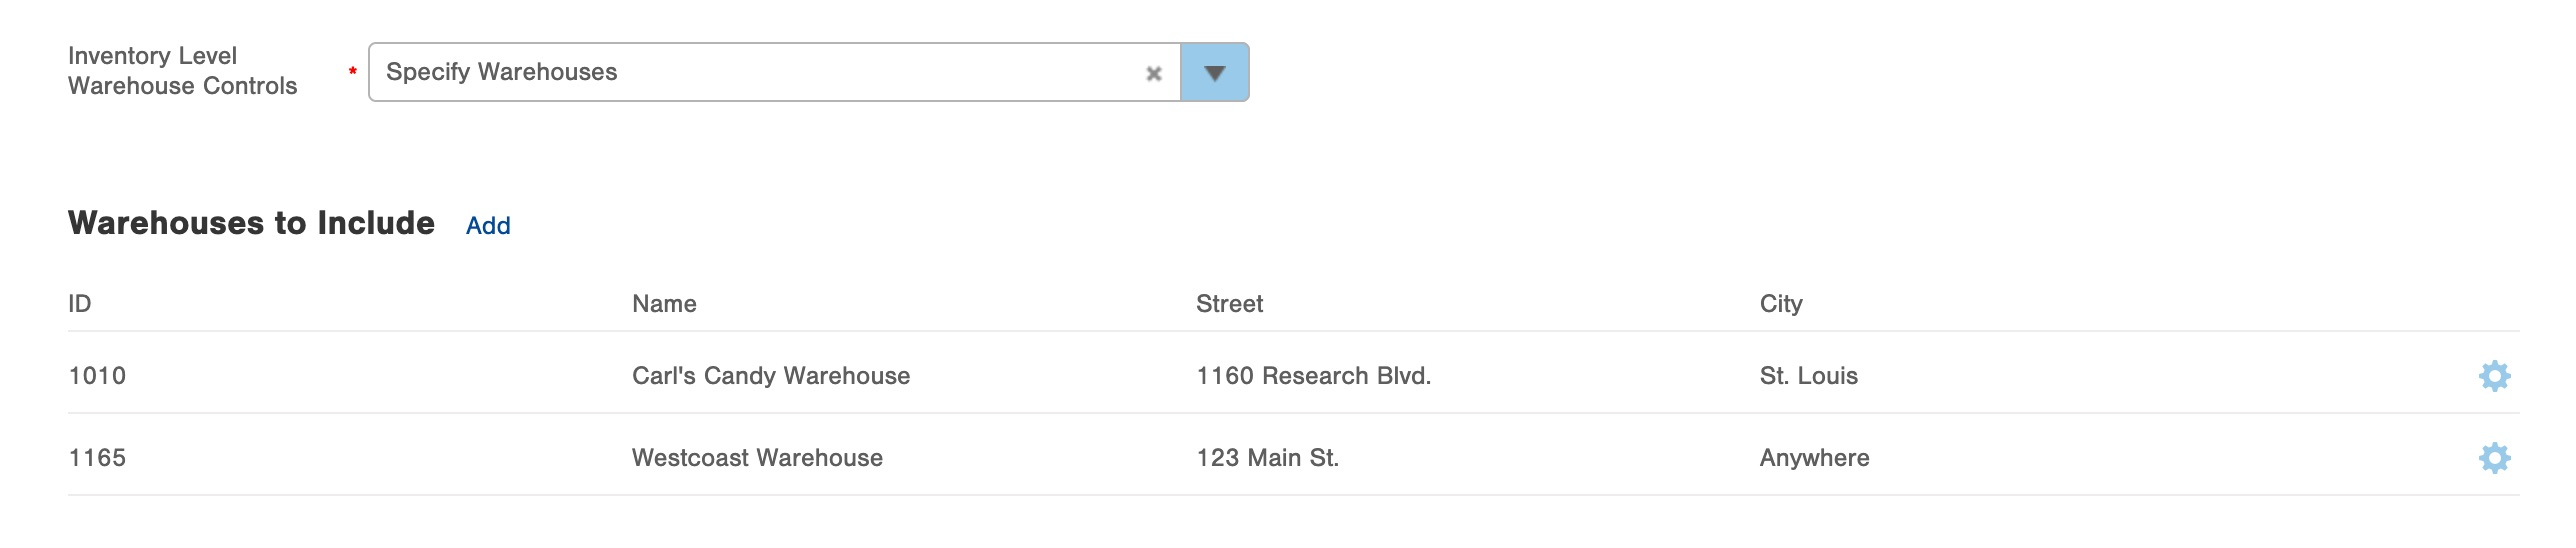
Inventory Level Warehouse Controls
For the connection you can set which warehouse, if there are more than one, that Inventory is synced from.
For each product you want Infoplus to fulfill, complete these steps in Shopify.
NOTE: Infoplus expects each SKU to be unique within Shopify. If more than one product is set up with the same SKU within Shopify, unpredictable behavior may occur. set to Infoplus.
In Shopify, access the Products section.
- Click on the product that should be fulfilled by Infoplus. An edit screen will appear.
- In the Fulfillment Service field, select Infoplus. Here's a screenshot showing the field:

- Click Save.
- Perform the same steps above for each product to be fulfilled by Infoplus.
NOTE: Orders will still be sent to Infoplus regardless if this is set but Shopify will only receive updates from Infoplus when the Order is shipped if this is set to Infoplus.
For each product you want Infoplus to communicate product inventory levels to Shopify, complete these steps in Shopify.
NOTE: The "Sync Inventory" field in the Shopify Shopping Cart Connection record must also be set to "True.
- Click on the product whose inventory you want to track. An edit screen will appear.
- In the Inventory policy field, select "Shopify tracks this product's inventory." Here's a screenshot showing the field:

- Click Save.
- Perform the same steps above for each product whose inventory you want to track in Shopify.
Inventory levels will automatically be exported from Infoplus to Shopify every 15 minutes, but you can force a manual export of inventory levels to Shopify, if desired.
- Open the Shopify Shopping Cart Connection record in Infoplus. (Go to the "Shopping Cart Connection" table and click on the Shopify record.)
- From the Actions menu, select Export Inventory. Here's a screenshot of the menu option:

Infoplus will evaluate product inventory levels in Infoplus versus those in Shopify. A Review screen will appear indicating what the results will be after completing the push process.

To push inventory levels to Shopify, click Submit. As indicated by the Results, inventory level data will be pushed to Shopify.
The process to connect Infoplus to your Shopify site is complete!
NOTE: Orders that are edited in Shopify does not update in Infoplus. See Knowledge Base article Edit Processed or Shipped Orders in order to edit orders in Infoplus that were edited in Shopify.
Once connected, you may want to turn on Shopping Cart Alerts in Infoplus. This lets you see messages that Infoplus receives from Shopify (i.e., if an error occurred).
Here's what happens after connecting Infoplus to your Shopify Site:
- When orders are created in Shopify containing items to be fulfilled by Infoplus, an order will automatically be created in Infoplus.
- When orders are fulfilled in Infoplus, Infoplus will communicate inventory levels to Shopify (if this setting has been turned on).
- The Shopify order will indicate the connection to Infoplus in the following ways:

Shopify Errors and Resolutions
Error:
When attempting to push inventory levels from Infoplus to Shopify, the following errors are received in the alerts table:
Invalid information was sent to the shopping cart. Infoplus received the following response '{"errors":["An item cannot be active at more than one location if one of them is a fulfillment service location."]}'.
or
Invalid information was sent to the shopping cart. Infoplus received the following response '{"errors":{"base":["None of the items are stocked at the new location."]}}
Resolution:
When Infoplus communicates with Shopify, via its API, to either update inventory levels or to mark an order as fulfilled, Shopify requires that a location id be specified to determine in what location the inventory level should be adjusted.
When using the Infoplus plugin, a "pseudo-location" is created within Shopify, which Infoplus will use as this required location value in its API requests. For this to work, all products for which Infoplus will be managing inventory, should be marked as such on the Shopify product setup page.
By doing this, products in Shopify will move to be in the "pseudo-location" of which Infoplus is aware. When items are setup to not be managed by Infoplus, but the Infoplus connection is setup to manage inventory, the location Infoplus will use in its API request will not line up with Shopify's expectation.
As a result, errors are returned by API requests to update inventory or fulfill orders. To fix this problem, set each product to use the Infoplus Fulfillment Service within Shopify. This can be done on a product by product basis or for all products in Shopify using Shopify's bulk edit tool.
To find a location id within Shopify, from within the Admin section of your Shopify site, click on the Settings link in the lower left corner of the page. Next click the "Locations" link and choose the Location that has the id for which you are searching. The URL in the browser should now contain something that looks like:
https://your-shopify-site.myshopify.com/admin/settings/locations/123456789
The number at the end of the URL will be the id for the location you are viewing, in this case "123456789".
---
Error:
Resolution:
This '504' error is returned when Infoplus tries to tell Shopify that it had received the order successfully. The '504' error means that Shopify never responded to the message that Infoplus had received the order. This can happen when the Shopify site is down or is busy/overloaded and cannot accept incoming connections.
---
Error:
Resolution:
This is another instance where all items in Shopify must have the same location id. This is the only accepted configuration for Infoplus to communicate with Shopify.
For example, SKU 1234 has an inventory item Id of 36400055058598 in Shopify. When Infoplus queries the Shopify API for locations of this SKU, it returns 47295299750 for the location ID.
The location ID associated with the Shopping Cart Connection in Infoplus is 48335290534. All three numbers do not match which is consistent with the above error. Infoplus cannot find items that do not match necessarily
Error:
“An unknown error occurred fetching Order data for this Shopping Cart. Please contact Customer Support.”
Resolution:
The alerts happened when Infoplus tries to pull an order in from Shopify. Within the Alert message, run the "Re-post Business Transactions" process from the 'Actions' menu (top right). This process attempts to re-do whatever was causing the error given in the alert. If after re-posting, the same error message is received, try this process:
1. Highlight the 'Order ID' in the Queue Message and copy the order ID

2. Then, go to the Shopping Cart Connection Log
3. Search for that 'Order ID" in the Contains field
4. Filter by LOB under Shopping Cart Connection
5. Add Notes as a column header on the Shopping Cart Connection Log Table
6. Click on the Notes column header and select Advanced
7. In the Contains field in the Notes Advanced options, input the Order ID copied earlier

8. Click Update
9. Check the message on the Notes section once all the settings have been implemented
10. If the order shows it has been imported, you can now Acknowledge the Alert by viewing the alert If the order shows it has not been imported, contact customer support for additional assistance

Related information:
